I recently inherited my Nan’s button tin and I honestly couldn’t be more thrilled!
Nan has given me various things over the years – her big bag of knitting patterns and needles as well as a generous donation of bottle tops and several old flower oases when she found out that I was making dollhouse miniatures out of pretty much anything I could find around the house.

The button tin itself is very old but some of the buttons even older! It also included an old glass pill bottle from the seventies with my Mum’s name on it. That too, was filled with buttons from when Mum, adorably, used to play ‘doctors’ with her toys and they needed special button-medication.
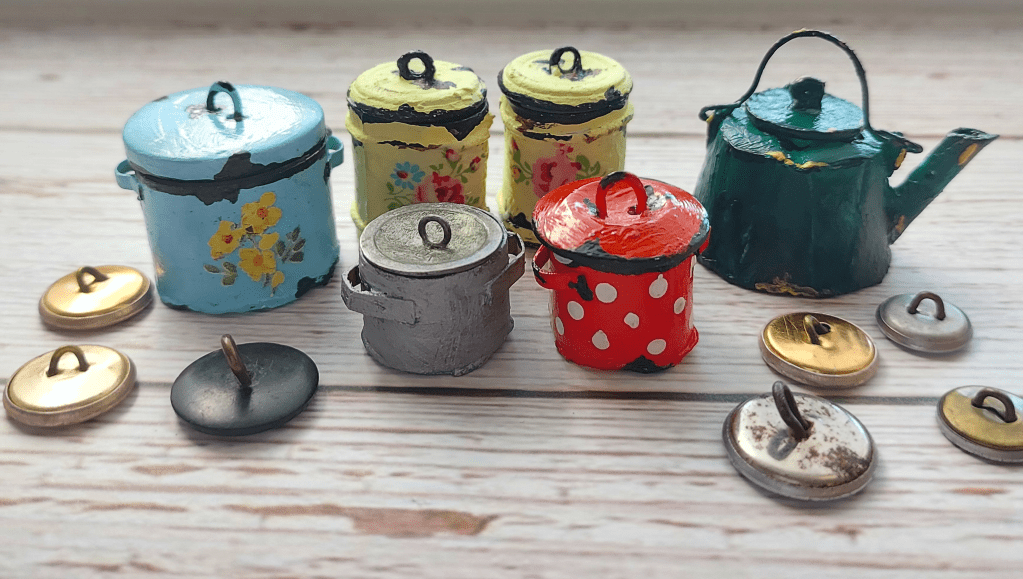
However, the best thing about these buttons were the old metal ones – the ones without any holes. As soon as I saw these, with their simple loops on the back, I was inspired to create some wonderful mouse-sized pots and pans!

Overall, they’re super easy to make – the charm is in how they are painted.
You will need:
- Some sturdy but flexible card
- A ruler and pencil (chewed end is optional)
- Some kind of tacky glue – I used modge-podge
- Scissors
- An assortment of buttons
- Embroidery floss (optional)
- Acrylic paint

I considered using Pi for the first time since school to work out the button’s circumference but realised I had my trusty sewing tape measure! Start out by measuring the edge your button and cut out a strip of card to this length plus a bit extra for sticking. The width of your strip depends on how deep you would like your pot or pan to be.
Roll it up and secure with a bit of glue and wait for it to dry – I held it together with a pin-curl clip but a paperclip or bobby pin would work too.

Once dry, add a bit of glue to the bottom and stick it on a square card base. I also added some embroidery floss at this stage as I wanted these particular pots to have some ridges. This is completely optional and as you can see from the images, I haven’t done them all like this. Wait for the glue to completely dry before trimming the base into a circle.
Paint with acrylic paint – the thicker the better so apply a few layers. If you’re using a darker card, you can always use white for the first coat which will make your final colour really pop. Make sure you paint your buttons to match!
Decorate your pot however you like! You can use spots or stripes or take a little flower off of a napkin and stick it to the pot as I have done on several of mine.
Finally, to make the pots look old, use black paint to imitate places where the paint has chipped. You can also use a rusty-brown colour to stain parts of the pot.
After the paint is dry, make sure you seal your creation with a couple of layers of varnish or clear nail polish. Et voilà!

One response to “Crafting Miniatures”
-
Absolutely fabulous! These pots look like they are really from bygone days, so charming and perfect for a miniature home!
LikeLike

Leave a reply to Maureen McIntosh Cancel reply